Edit Screen of MIDI Arranger, where Styles are created
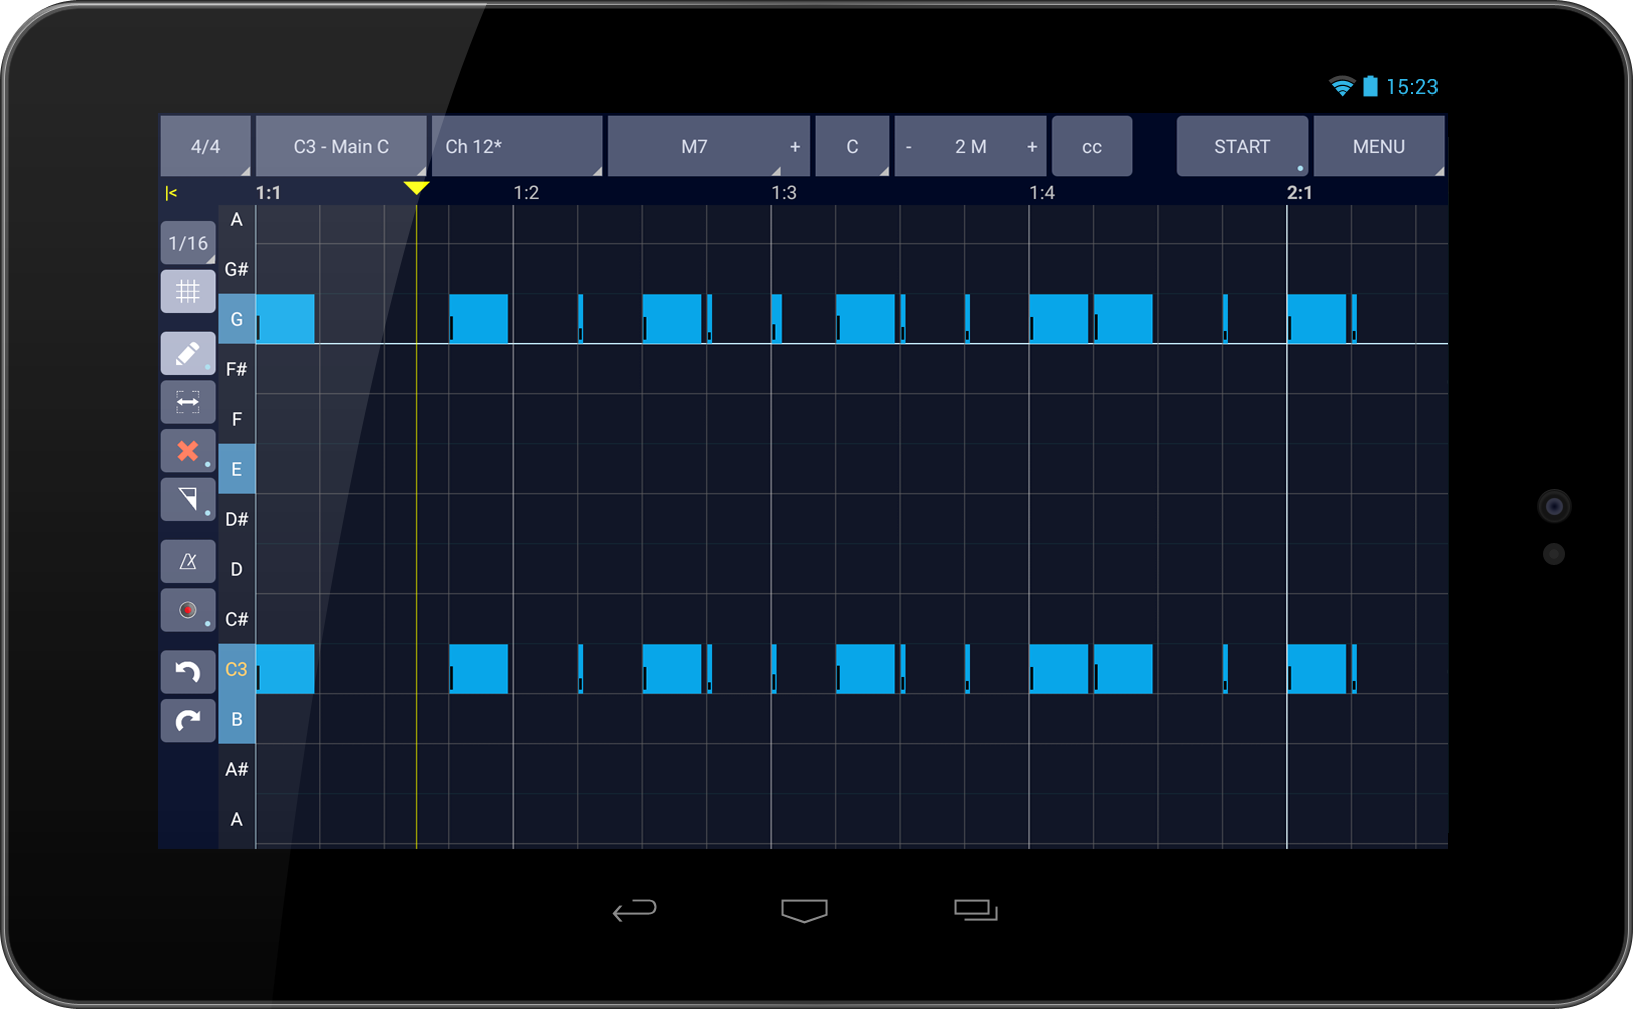
- This is the screen where you create your Style.
- The interface is very similar with a Computer Software Sequencer.
- When you create a Style, you must define the type of each track: Unchanged, Chord, Melody, Bass. You can do this and other important settings that drive harmonization in Style Track Config and Scene Track Config from MENU.
- If you don't have to use different instruments for the same track in different Scenes then use Style Track Config. That way you only have to maintain 16 configuration at the most, one for each track.
- When you use Scene Track Config, it will overwrite the settings in Style Track Config when this scene is active. This functionality allows you to create Scenes that use different instruments on certain tracks then the rest. Read more about this in Configurations section bellow.
Top Buttons
From Left to Right
- Time Signature - time signature of your style.
- Scene - style part that is currently being edited.
- Midi Channel - track within this Scene that is currently being edited.
- Chord - chord in which track notes are defined.
- One chord is enough for MIDI Arranger to work properly. Notes from this chord will be harmonized to other chords while playing live. I recommend using a chord with 4 notes, like CMaj7 which is the default, when defining arrangements.
- Add another chord by pressing "+" on the right.
- Adding multiple chords and defining arrangements for each will allow you to create more complex Styles. For example, if you define different patterns for Maj7 and min, while playing live, for all min chords, pattern defined for min will be used and pattern defined for Maj7 will be used for all other cords. Different musical nuances can be achieved based on the chord you play.
- Root Note - root note in which this track's arrangement is defined.
- Number of Measures - the number of measures for this track. Pressing +/- on measures button will increase / decrease this track's length.
- CC - tap this button to show Midi Control Events (CC) defined for this track. CC are events that change the value of various controls. They can control effects (Cut Off, Attack, Release etc.) or other functions of your synthesizer.
- START/STOP - press this button to start/stop MIDI Arranger or tap and hold it to make it start and record on first played key. When MIDI Arranger is running you can play chords and it will recognize them so you can immediately check to see how your arrangement sounds when transposed to other chords. When you stop it and start again or if you change the track it will reset back to chord selected in Chord drop down.
- MENU - this is where additional configurations and utilities can be found.
MENU Options
- Copy Data - open a panel in the right where you can copy notes and CC from other scenes or other tracks.
- Copy Data From Chord - open a panel in the right where you can copy notes and CC from other chord of this track.
- Save - go to Style Library where you can save your Style. In Style Library menu there are various options to add/rename/delete categories and sub-categories. You can also delete or rename other Styles.
- Style Config - open Style Config.
- Style Track Config - open Style Track Config where midi channel or track can be configured at Style level.
- Scene Config - open Scene Config.
- Scene Track Config - open Scene Track Config where midi channel or track can be configured at Scene level.
- New - create a new Style. Make sure you save your current Style before creating a new one.
- Reset Zoom - reset zoom to default levels.
- Select All - select all notes.
Editing Area
Track position bar [1:1, 1:2,...]
This is where track position in measures and beats is displayed.
First number represents the measure and second number the beat. When MIDI Arranger is running, position indicator will move from left to right and indicate current playing position in track.
It can be moved back or forward by dragging it or by simply tapping somewhere on the track position bar.
Notes Area
This is where your style part is defined. It is a grid with rows and columns, a piano roll. Rows are midi notes and each row has a label on the left with note name. Notes which are part of current chord in current root are highlighted. Notes can be added here manually, by tapping the screen, or by recording from keyboard. They have a small bar on the left which shows note velocity.
- Multi Selection - Multiple notes can be selected with this gesture: tap, hold until 'Multi Selection activated' message is displayed, move to select notes (a rectangle is drawn), release.
- Zoom In / Out - Zoom in and out using two fingers.
Tools
Left Buttons from Top to Bottom
On the left of the screen there are tools buttons.
*Buttons which have a small
white dot in bottom
right corner have additional functionality if you press and hold them.
- Grid Size - set the grid size. Available divisions: 1, 1/2, 1/8, 1/16, 1/32, 1/64, 1/4T, 1/8T, 1/16T, 1/32T
- Snap to Grid - notes are added, re-sized and moved only within the grid constraints.
- Edit Tool - notes can be added by tapping the screen or moved with this gesture: touch-hold-move-release. Double tapping a note will delete it. Tap and hold it to configure the direction on each notes can be moved, horizontally, vertically or both.
- Resize Tool - notes can be re-sized with this gesture: touch-hold-move-release.
- Delete Tool - notes can be deleted by tapping them. If you touch and hold this button a dialog will popup were you can delete multiple notes, between measures and beats.
- Velocity Tool - change velocity of a note with this gesture: touch-hold-move up or down-release. If you touch and hold this button a dialog will popup were you can define default velocity for new notes.
- Metronome Tool - a metronome will play while MIDI Arranger is running.
-
Record Tool - notes played on
the keyboard will be recorded in current midi channel if MIDI Arranger is running.
If you touch and hold this button a dialog will popup were you can enable or disable quantization. When quantization is enabled all recorded notes are moved to the closest grid vertical line, to the left or to the right. - Undo - Tap to undo your last operation.
- Redo - Tap to redo your last undone operation.
Configurations
Style Config
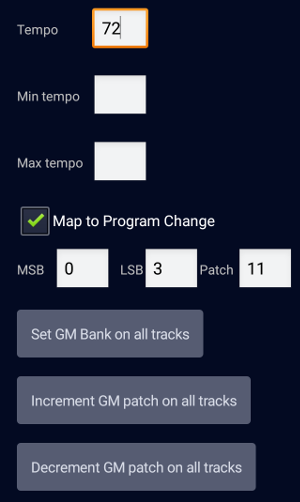
- Tempo - If defined, tempo will change to this value when style is loaded.
- Min / Max tempo - If defined, tempo can only be changed between these values when style is playing.
- Map to Program Change - If defined, MIDI Arranger will automatically load this style when these MSB, LSB and Patch are received from external synthesizer. On Kronos, this can be used to automatically load a specific style when a Combi is selected.
- Set GM Bank on all tracks - this will check 'Use GM Bank' (see bellow) for all tracks.
- Increment / Decrement GM patch on all trakcs - this will increment / decrement the value of Patch for all tracks. Useful when importing a style from yamaha format and GM patch numbers don't match current GM number (start from 1 instead of 0).
Style Track Config and Scene Track Config
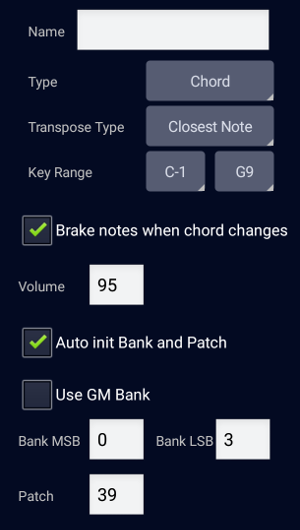
- Style Track Config - define configurations at Style level, will apply to all tracks from all Scenes.
- Scene Track Config - define configurations at Scene level. These will overwrite the ones defined at Style level and will only be used when this Scene is active.
- Name - Name of current track.
-
Type - the type of channel or track. It can have 4 values:
- Unchanged - No harmonization. Use it for drum tracks.
- Chord - Use it for chordal parts.
- Melody - Use it for melodic parts.
- Bass - Use it for bass parts.
-
Transpose Type - This defines how notes will be transposed based on root note. It can
have 2 values:
- Transposed - Notes will be transposed as they were defined. Eg: C4, E4, G4 in C root will be transposed to F4, A4, C5 in F root.
- Closest Note - Notes will be transposed closest to the root note. Eg: C4, E4, G4 in C root will be transposed to F4, A4, C4 in F root.
- Key Range - defines the range of notes. When harmonized notes will always stay in this range.
-
Brake notes when chord changes - If this option is checked then when recognized chord
changes, notes which are currently playing will be stopped, harmonized in the new chord and
started again. This is helpful for long notes like pads and strings.
Don't use this option for acoustic instruments unless you really want this behaviour. - Volume - volume of current track.
-
Auto init Bank and Patch - If this option is checked then 3 inputs are showing up. Bank
MSB, Bank LSB and Patch. These three values initialize an instrument for this
track,
on your synthesizer. This values are synthesizer specific.
If Use GM Bank is checked then MSB and LSB will disappear and the values defined in Main Settings will be used.
On Korg Kronos, to init the instrument number 8 from bank B, when GM bank in Global is Korg, these values must be set: Bank MSB = 0, Bank LSB = 1, Patch = 8.
Scene Config
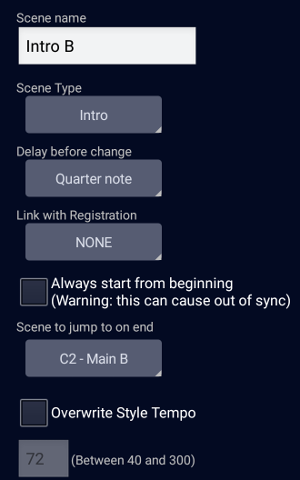
- Scene name - this name will show up in Live Play.
-
Scene type - Scenes can be of 6 types:
- Intro - will jump to a specified scene on complete.
- Main- Scene of this type loops forever.
- Fill In - Same as Intro.
- Break - Scene of this type will jump back to previous selected scene.
- End - When scene of this type is completed, MIDI Arranger will stop.
- Pad - Scenes of this type can be activated along with other scenes.
-
Delay before change - Defines how much scene will wait before actually changing.
- One Measure
- Whole Scene
- Half note
- Quarter note
- Eight note
- Sixteenth note
- Immediate
- Link with Registration - Linked Registration will be automatically activated when scene is activated.
- Always start from beginning - Scene will always start from beginning. Use this option in conjunction with Delay before change to make sure this scene will not play out of sync.
- Scene to jump to on end - this is showing up only for Intros and Fill Ins.
- Overwrite Style Tempo - If a tempo is defined here, scene will play at this tempo when activated.